
HomePlantBot care guide
Aloe Vera Care Guide
Give the identified plant adequate light and a draining container, and check the root zone before watering.
Grow aloe as a plant; do not assume it is a medicine.
Give the identified plant adequate light and a draining container, and check the root zone before watering. Household plant care does not establish that leaf preparations are safe to eat or suitable for treating an injury.
Practical next check
Use the care sections for growing; consult the linked NIH resource for evidence and safety about aloe products.
What you’ll learn in this article
- Understand the essentials of aloe vera care
- Identify ideal lighting and soil conditions for healthy growth
- Master watering, feeding, and repotting techniques
- Learn how to propagate aloe vera effectively
- Troubleshoot common problems like pests and leaf damage
- Discover styling tips for aloe in homes and businesses
Affiliate disclosure: HomePlantBot may earn from qualifying purchases through the Amazon links below, at no extra cost to you.
Introduction
Aloe vera is one of the most cherished houseplants around the world, not just for its iconic spiky look but also for its low-maintenance nature and multitude of uses. Whether you’re looking to green up your home or add natural charm to your business, aloe vera is a versatile and rewarding choice.
Ideal for small apartments, cozy shops, or sprawling office lobbies, aloe vera brings a blend of functionality and aesthetic appeal. Following a proper aloe vera care routine ensures that your plant stays happy and healthy—ready to add beauty and even minor medicinal benefits to your everyday life.
Aloe Vera Overview & Medicinal Uses
What Is Aloe Vera?
Aloe vera is a succulent plant species native to arid and semi-arid regions, most notably the Arabian Peninsula. With its thick, fleshy leaves and serrated edges, aloe is built to store water and withstand hot, dry conditions.
Identify the plant before applying care or use claims
Kew accepts Aloe vera and lists Aloe barbadensis Mill. and the cited historical chinensis names as synonyms. These names do not establish medicinal safety.
Aristaloe aristata (formerly Aloe aristata) and Aloe juvenna are separate species, not Aloe vera cultivars. Confirm the identity before applying species-specific care; an aloe-like appearance is not evidence that a leaf is suitable for a remedy or food.
Source and further guidanceTopical and Medicinal Benefits
The gel extracted from aloe leaves is often used to soothe burns, moisturize skin, and treat minor wounds or irritations. It’s a popular ingredient in natural lotions, sunscreens, and cosmetics. Do not infer that a homegrown aloe is approved for eating or preparing a medicine. Gel, latex and whole-leaf preparations have different evidence and risks. Source and further guidance
Consumption Warning
Important: While aloe vera gel is generally safe for topical use, ingesting latex from the inner leaf layer can lead to digestive upset or toxicity. Always consult a healthcare provider before internal use.
Looking for more houseplant ideas? Check out our full guide on houseplant types and selection.
Light & Soil Requirements
How Much Light Does Aloe Vera Need?
Aloe thrives in bright, indirect sunlight. Ideally, place your plant near a south- or west-facing window where it can enjoy several hours of light daily. Outdoors, it does best in filtered light or partial shade—especially in hot climates—to avoid scorching the leaves.
Soil Preferences
- Preferred mix: Cactus or succulent potting soil for quick drainage
- Optional amendments: Add perlite, coarse sand, or pumice to improve aeration
Choosing the Right Pot
- Drainage: Always use a container with drainage holes to prevent root rot
- Material: Clay or terracotta pots help wick away excess moisture and promote airflow
Watering & Fertilizing
How Often to Water
Aloe prefers the soil to dry completely between waterings. Typically, you’ll water every 2–3 weeks in warm weather, and even less in winter. Overwatering is the most common mistake for aloe owners.
| Symptom | Likely Cause |
|---|---|
| Yellow, mushy leaves | Overwatering or root rot |
| Dry, curled leaves | Underwatering |
Watering Tips
- Use the soak-and-dry method: thoroughly water until excess drains, then wait until soil is completely dry before watering again
- Always check the soil moisture with your finger or a moisture meter
Fertilizing Aloe Vera
- Type: If feeding is needed, choose a labeled succulent fertilizer; 10-40-10 is not a balanced N-P-K analysis. Account for nutrients already present in the mix. Source and further guidance
- Frequency: Feed once a month during spring and summer
- Pause: Do not fertilize during fall and winter dormancy
Helpful products for this care problem
Helpful products for this plant care problem
If this is the issue you are solving, these tools can make the next step easier. They are optional, but they match the care problem covered in this article.
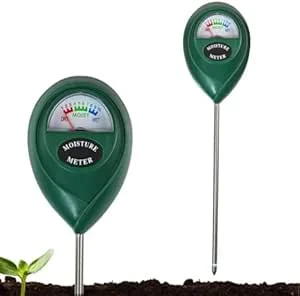 Soil moisture meterHelps check whether the root zone is actually ready for water.View on Amazon (paid link) ↗
 Digital hygrometerHelps track humidity and temperature around sensitive plants.View on Amazon (paid link) ↗Clip-on grow lightUseful for dim rooms, winter care, and plants stretching toward light.View on Amazon (paid link) ↗
As an Amazon Associate, HomePlantBot may earn from qualifying purchases.
Propagation & Repotting
How Aloe Vera Reproduces
Aloe vera produces offsets or “pups,” which grow from the base of the parent plant. These can be separated and planted as new, independent plants.
Propagation Steps
- Gently remove the pup from the base of the mother plant. Use a sterilized knife if necessary.
- Allow the offset to dry for 24–48 hours so the cut forms a protective callus.
- Plant in a small pot with succulent-ready soil. Lightly water after a few days.
Repotting Basics
- When: Repot when roots outgrow the container or the plant becomes top-heavy
- Pot selection: Choose a container 1–2 inches larger in diameter
- Reduce transplant shock: Water sparingly for the first two weeks after repotting
Troubleshooting Common Issues
Common Aloe Vera Problems and Fixes
| Issue | Cause | Solution |
|---|---|---|
| Brown or dry tips | Underwatering or sunburn | Relocate to softer light and adjust watering |
| Soft, yellowing leaves | Overwatering | Let soil dry completely; repot if required |
| Drooping or leggy growth | Low light | Move to a brighter location |
| White cottony spots | Mealybugs | Confirm mealybugs and check plant-sensitivity guidance before any alcohol spot treatment; monitor remaining insects. Source and further guidance |
Preventative Aloe Vera Checklist
- Rotate plant monthly for even light exposure
- Inspect for pests weekly
- Clean leaves gently with a damp cloth every few weeks
- Use fresh soil annually to replenish nutrients
Conclusion
Caring for an aloe vera plant is not only rewarding but also surprisingly simple. With the right placement, watering schedule, and minor adjustments, your aloe can thrive for years—adding calming greenery and practical benefits to any space.
Remember these key takeaways:
- Bright indirect light and well-draining soil are essential
- Water only when the soil is dry
- Propagate pups for more plants
- Adjust care seasonally and monitor for pests or stress signs
Want to discover more green companions? Visit our full guide on houseplant types and selection.
Bonus: Aloe Vera as a Business Decor Element
Why Aloe Fits in Commercial Spaces
For offices, storefronts, and waiting rooms, aloe vera is a stylish and low-maintenance addition. Its sculptural shape brings a calming presence, and its easy care requirements mean you don’t need a green thumb to keep it alive.
Benefits for Busy Professionals
- Requires minimal watering
- Long-lasting and durable
- A decorative succulent; it does not replace ventilation or an air cleaner. Source and further guidance
Design Tips
- Use clay pots to complement modern or rustic design themes
- Group with succulents for a Mediterranean vibe
- Place on window sills, reception desks, or shelf spaces for visual impact
Thinking of expanding your plant collection? Explore our complete guide to houseplant selection and find the perfect plant for your home or business.
Need help choosing the next care step?
If the symptoms in this article match your plant, use Plant Bot or the rescue checklist before buying anything. A quick diagnosis helps you fix the actual cause, not just the most visible symptom.
Quick decision checklist
- Check the growing conditions before changing everything.
- Adjust one care factor at a time.
- Use symptoms to guide the next step.
- Give the plant time to respond after corrections.